How to become a Photographer – In this tutorial, we are going to take you through the core concepts and fundamental concepts of photography and give you recommendations so that you can start making some awesome images. The other good part about this tutorials is to convey some of the settings in your camera you should be able to try it out practically. Follow the concepts, on how to become a photographer, experiment along and you will see the difference in your images. You just need to understand what it takes to make those awesome images. Learn basics on how to become a photographer without going to school. You can shift to professional photography after knowing everything on how to become a photographer for beginners.

Learn photographer in few steps
Learn How to become a Photographer
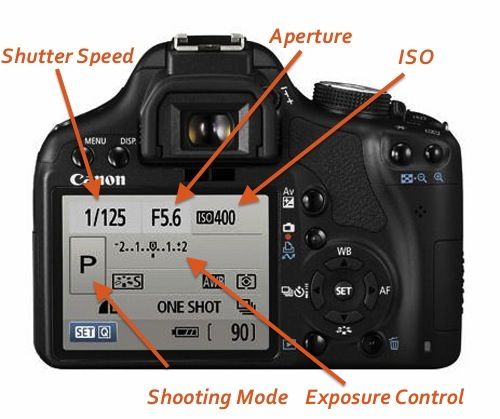
Overview of the main setting in the camera
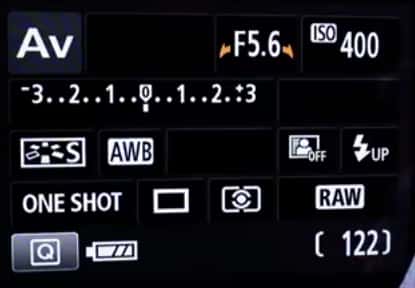
We will give an example of Canon 1200 D which is an entry-level camera in the market. Now you can check the various displays the settings what the camera does and you should be able to follow the instructions.
As a beginner in photography, you don’t have to go through very in-depth or any advanced settings or any of those things. Forget about all the various advanced features or setting whatever the camera supports. Let’s start with the basics on how to become a photographer without going to school.
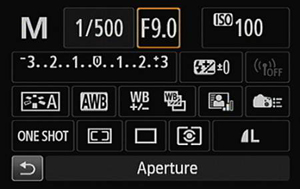
Aperture – If you are shooting in aperture mode the very basic exposure triangle parameters. Bit your “shutter speed” your “aperture” and your “ISO”. What does it mean or what impact it has on your image we will see that.
Exposure compensation – It’s about when you underexpose when to over expos make the image brighter or darker what to do.
Picture style – What kind of pictures that you should be using we will look at that.
White balance – Your white balance so what white balance you should be using?
Shooting mood – Weather you want to shoot it in one shot mode or servo or depending on what is happening in yours scenery or focusing options.
Images quality – What kind of images quality you should be using
Focusing point – The last point will be about focusing points. When to use what kind of focusing points.
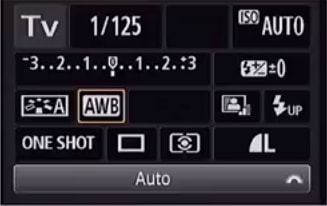
The above images show what you see on your camera. The same concept applies to your ‘Nikon’ cameras as well. You need to understand the display to continue to learn on how to become a photographer. If you look at the info the display what your Nikon camera gives even that will have your exposure triangle parameters about Aperture, ISO, Shutter speed the same things. You will also find compensation exposure your white balance parameters and in case of your focusing mode whether it is like autofocus single autofocus continuous so what kind of focusing you need or you what to use.
Learn Basic Concepts of How to become a Photographer for Beginners
Images Quality
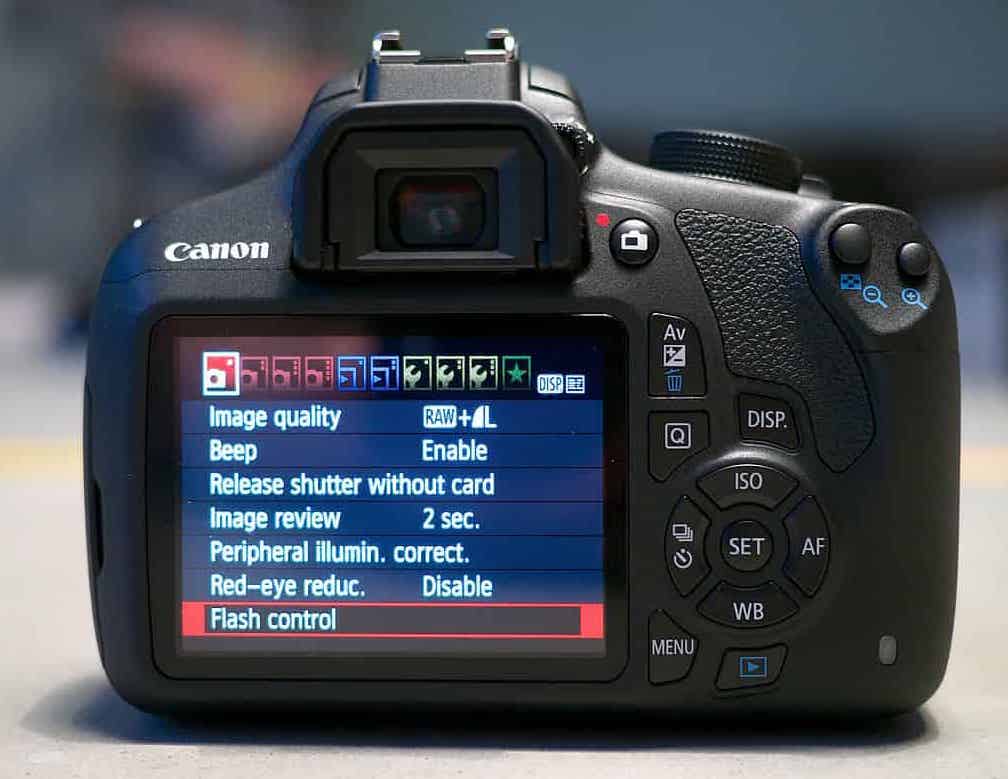
As a first step let us understand about the image quality. So in the below picture, you can see in the info, quickly you can press the Q axis the Q button at the back and access this.
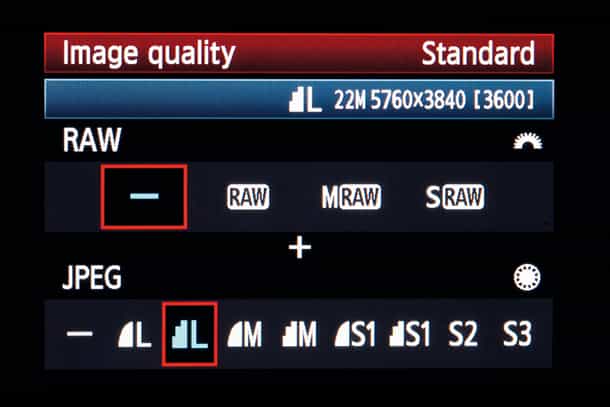
You can go into the menu option and you will see image quality. If you go into the images quality you have various options right from the large to the medium to small. Then you can see the combination of RAW + large and then just the RAW. So here you are welcome to use any of this combination and each of them as you can see in the above image. If you will try and move the analogue you will see resolution will keep on changing which is the print dimension.
Note – So as a beginner you should understand that RAW probably may not be the right option because you may not be comfortable on how to process the RAW images. So chances are you end up using just the JPEG. But our recommendation would be to use a combination of RAW + Large depending on the size of the memory card. Take these recommendations very seriously on how to become a photographer.
Key advantages –
RAW
One of the key advantages of RAW file is even if you make minor mistakes in the field may be in respect to the various settings with respect to your white balance exposure so even with respect to the picture style any of that various combination you make a mistake still there are ways in which you can very easily fix if it is RAW. So RAW is very powerful, you can use the option RAW + large.
White Balance
You can access white balance with quick access button at the back by pressing Q. You can go directly to white balance where you’ll find various parameters.

What is white balance?
In the simple terms white balance is one of the key parameters which decide what kind of colours you what in your image. White balance is nothing but telling the camera to get a white color as a proper white depending on the lighting situation.
White balance is expressed in Kelvin. So in the below images, you can see white balance for the Canon 1200 D. You will see all these various kind of white balance setting.
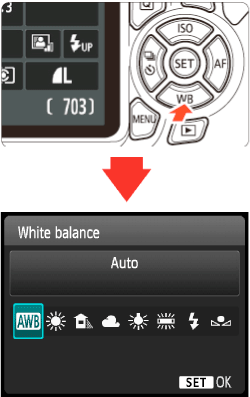
a) AWB (Auto white balance) – Where the camera decide what kind of colors to put or you can also say what kind of Kelvin value to put depending on the lighting.
b) Daylight – The daylight has an approximate value or five thousand two hundred Kelvin
c) Shade – Shade is approximately seven thousand Kelvin.
d) Cloudy – Cloudy is six thousand Kelvin
e) Tungsten – Tungsten light is about 3200 Kelvin
f) White Fluorescent – White fluorescent light is about 4000 Kelvin
g) Flash – Flash is for outdoors. It is in the range of 5400 Kelvin
h) Custom white balance – So it depends on your camera model. You may have an advance setting of the manual white balance where the K will be displayed and these values you can manually put.
Note – When it comes to outdoor if you use white balance settings of anything above below 5000 Kelvin for example ‘Day Light’ or ‘Tungsten’ or ‘fluorescent’ any of this parameter where the K is below you will get more of the bluish cast in your image. By learning about white balance you have come halfway through the learning process of how to become a photographer.
Or
In same outdoor conditions if you go into the option of ‘Shade’ or ‘Cloudy’ which is six thousand Kelvin. We mean to say anything above 6000 K you’ll get more yellowish color in your image. As per recommendations from professional photographer do not go with auto white balance.
Exposure Triangle

Now comes the most important part of photography which is your exposure triangle parameters of shutter speed, aperture and ISO. Lets first know what these parameters are, what impact they have on the image and what kind of setting you should be using.
Put ur camera in shutter priority mode. So here what happens as a photographer we set the shutter speed.
What is Shutter Speed?
Shutter Speed is a duration of time your shutter is open for the light to enter and hit your sensor.
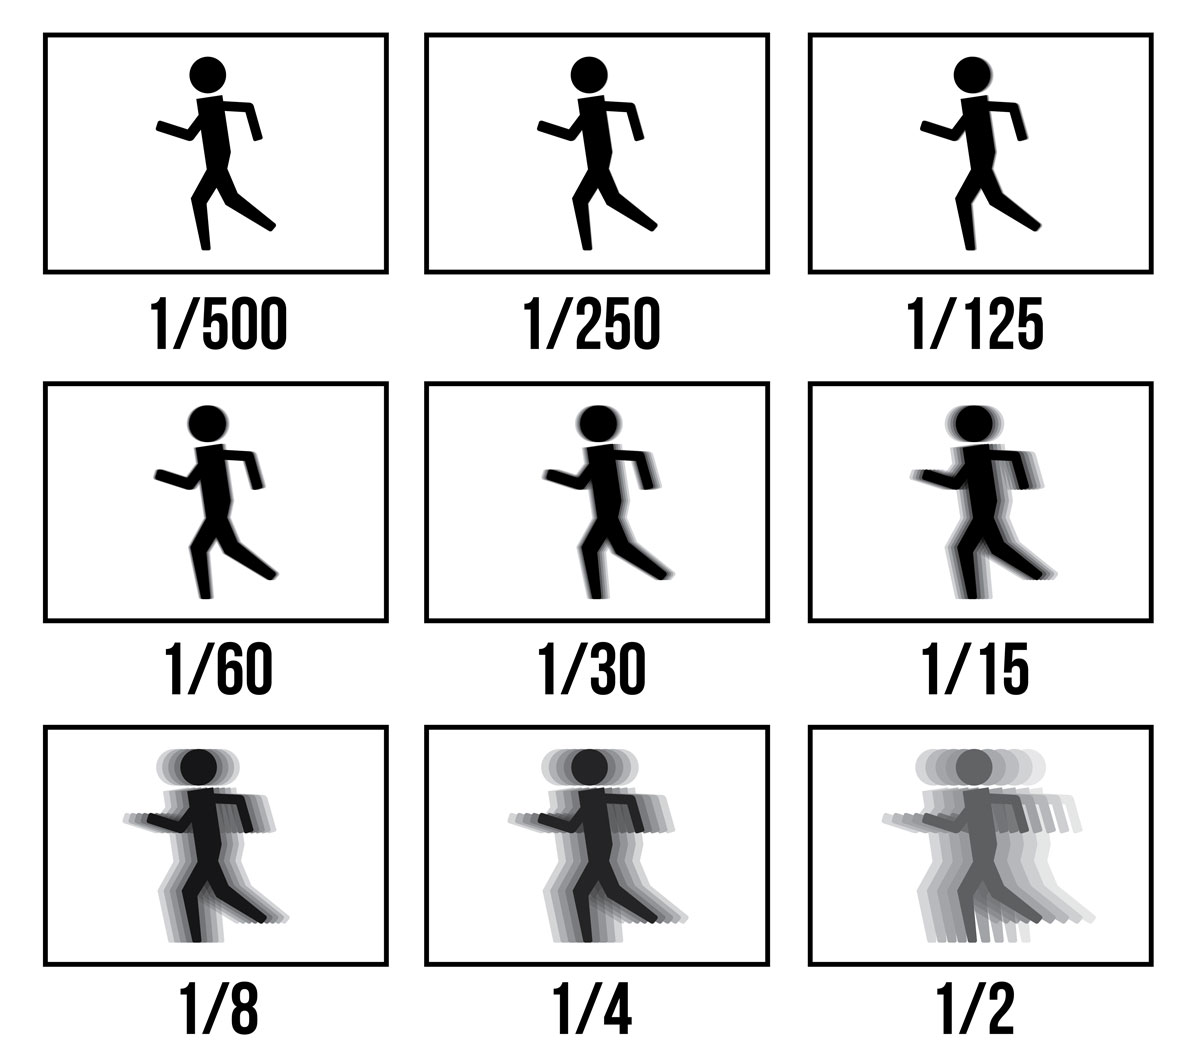
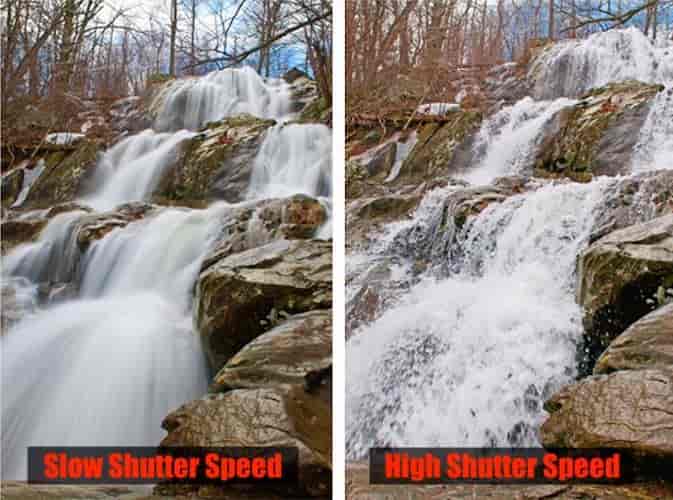
So if you look at the shutter speed, value of low shutter speed basically causes motion blur, if you are shooting handled the shake which comes into the images that are because of slow shutter speed.
Whereas you if take the shutter speed up till the highest shutter speed which freezes action.
So what the shutter speed do – low shutter speed is responsible for motion blur or camera shake which comes because of handle shooting whereas high shutter speed freezes the action. So if you look at this particular images where you can see that the waterfalls the overall action has been frozen whereas the same images when shot at a very slow shutter speed of say 2 or 4 seconds at that slow shutter speed as you can see it’s more of a silky flow of water.
Shutter speed is a time the shutter is open and then you can decide how you want to take that image. Our recommendations when it comes to shutter speed, if something is totally static i.e a person standing not moving or it could be a landscape scene. Anything which is totally static you don’t have to worry too much about the shutter speed. For any beginners, we recommend always use a tripod to get a proper setting.
Aperture
First of all, go to aperture priority which is AV mode for Cannon and A mode for Nikon. Aperture is basically one of the parameters –
What is Aperture?
Aperture is the opening of your lens. Aperture has blades inside so smaller aperture say if I go all the way down to ‘f4’ an aperture a smaller f-number basically means a very large opening of your lens. Whereas if you move up all the way to ‘f16 or f22’ that is a very small opening. A very small opening means less amount of light coming into the camera. In the picture below a smaller F number is a large opening and a larger f-number is a very small opening. One of the key things about aperture is that controls the depth of field.
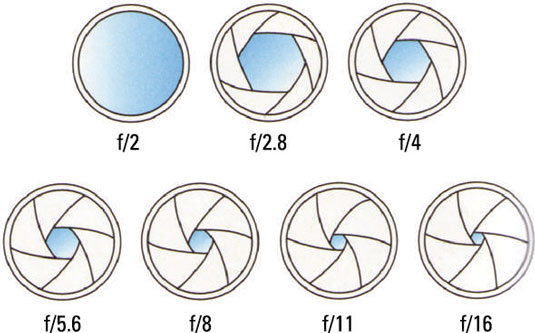
The Depth of field is that area of your photograph which is in sharp focus. As a photographer, you need to decide where you want to use shallow depth of field where you want to use a larger depth of field.
Quick Tip
If it is just one single subject what you are trying to shoot in more situations a lowest F number supported by your lens will do. Whereas if there are more subjects one behind the other and you want all of them to be in sharp focus than you F number have to increase.
Similar to shutter speed aperture is one of the parameters responsible for your depth of field. Your focal length of the lens then camera to subject distance also comes into the picture. But go ahead use the aperture based on the scene and as a photographer you decide whether you want a lower F number or a larger F number to get an appropriate depth of field.
What is ISO?
ISO is nothing but the sensitivity of your sensor. In golden days when we used film, so they were basically chemicals in the film and then that is what we called as the sensitivity of the film. So the ISO or the ASO what we used to call was more of how fast those chemicals can react to light. In a digital camera, it is more to do with your sensor. We mean to say that how fast the sensor can react to light that is what ISO is all about.
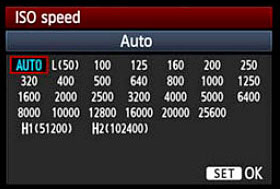
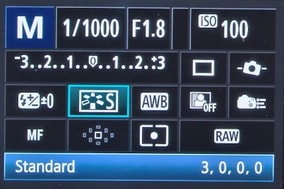
If you look into the camera whatever ISO you have in your camera. If you go into quick view option and go into ISO you will see the image below –
Here you can see Auto then 100, 200, 300, 400, 800, 1600, 3200 & 6400 ISO’s. You will see different ISO based on your camera model. Again we recommend you all not to use ‘AUTO ISO’. Because when you put it in auto ISO the camera decides what value to use based on the other parameters.
Go ahead and play with ISO’s, so remember if you increase the ISO you will get chances of more noise.
What is noise in images means?
Noise is a picture quality difference you will see after clicking on the picture. When every you zoom in you will see small grains in blue, green, pink color so that is noise.
Depending on your camera a low ISO is always preferable but depending on mid-range or high-end cameras ISO value can actually take it up.
These were the three very basic exposure triangle parameters. How do they work together? How modes work in a professional camera? If you learn how to become a photographer you need to know what features does your professional camera have –
Let’s take an example
We have various modes in your camera we will select auto mode where camera decide all three parameters. The camera doesn’t know what’s in your shooting, the camera will take into account the lighting and then it will put its own value of shutter speed, aperture and ISO to give you a decent image. Probably that way that may not be what you want.
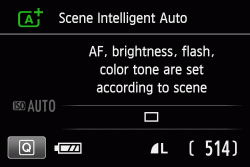
AUTO mode – In this camera sensors adjust AF, brightness, flash color tone and another setting automatically. As of the light is less the camera will pull out the flash.
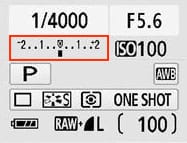
P (Program) mode – In program mode when you hold press the shutter and release you can see for a given ISO 400 the camera decides both the shutter speed and aperture.
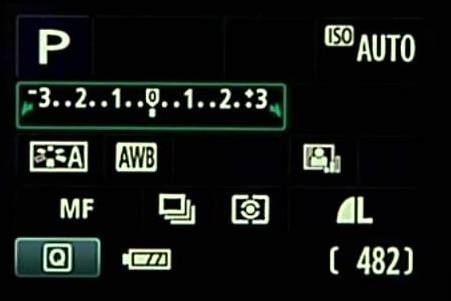
In this also you don’t have control but you can increase your ISO or you can put it in auto mode.
If you increase ISO you need to click on ISO you can increase the value and then half press shutter release button, in the below photo you can see the value of shutter speed and aperture varies. So you have no control over what happens because in this also camera decide the parameters.
TV mode – Which is the setter priority mode or Nikon guy it is the yes mode. So when you put it in TV mode as a photographer you decide what kind of shutter speed you want for a given ISO. Then you half press the shutter release button camera will give you a particular aperture.
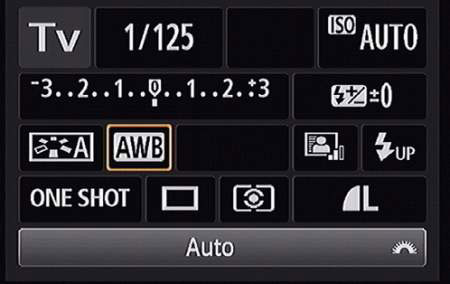
Note – Now remember if the aperture is blinking which can happen in any cases you should know that it is not capable of very high speed in the low light situation. In that situation, you can start decreasing the ISO till it stops blinking and it will be a good value.
Also, remember if the movement is happening in the subject you will get shake blur. So keep a watch on shutter speed, if any movement is happening in the scene then make sure to watch out for the shutter speed. High shutter speed if you want to freeze the action and if you purposely want a motion blur to go with a slow shutter speed.
AV mode – This is the aperture priority mode and for Nikon guys, it is the A mode. In case of aperture priority as a photographer, you decide what aperture you want for a given ISO. Then you half press your shutter release button camera will give you a responding shutter speed. You vary your aperture speed then the shutter speed will vary. So this is more recommended when there is not much movement happening in the scene. If you are doing landscape photography or any of those areas of photography where your depth of field is more important then the shutter speed.
M (manual) mode – This is a little bit advanced mode for beginners we would not recommend that because you have to decide all the three parameters based on the metering and other complex things not recommended. Go with any of the other mode i.e aperture mode, shutter priority or program mode also will work.
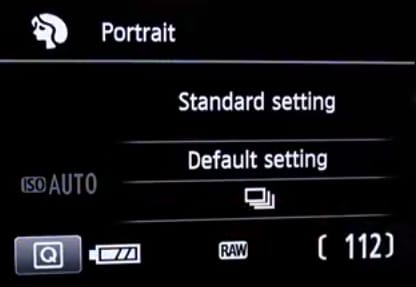
Portrait mode – In portrait mode, you see the ISO will be auto and then default setting, so in this mode the camera gives more emphasis to the depth of field. In case of portrait mode, the camera tries to give you a shallow depth of filed.
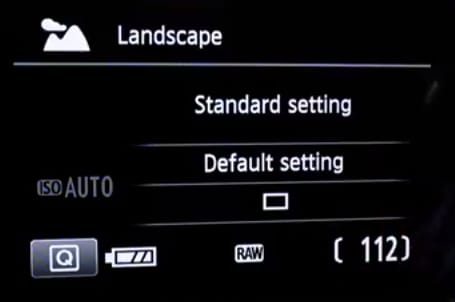
Landscape mode – Even in case of landscape you will see default setting are single short, not the bust mode and again the priority is given for larger depth of field. In the case of landscape, it tries to give you a larger depth of field to give everything in focus.
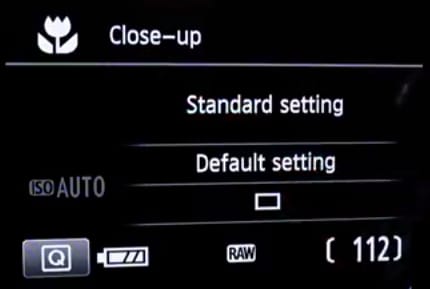
Close-up Portrait mode – Again in that situation, it is more of trying to give you a shallow depth of field.
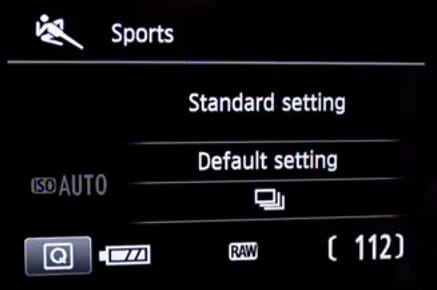
Sports mode – Action photography as you can visualise or you can think it is more to do with action happening that you want to phrase it. So in this mode, the camera is going to give you a faster shutter speed.
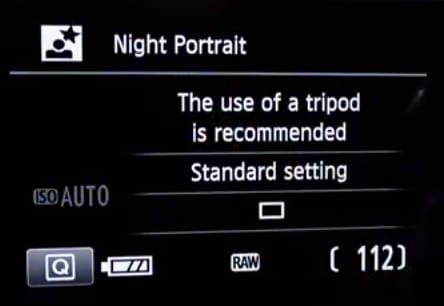
Night Portrait mode – Star night photography, the camera will give you a long exposure.
Now depending on what kind of camera model you’ll have these are some of the varied kind of shooting modes what you have. So once you understand the combination of shutter speed, aperture and ISO then play around with the settings and as a photographer, you decide what kind of setting you want.
So it’s our recommendation what every genre you choose where an action is happening you want to freeze it or you want to create a motion blur go with ‘shutter priority’ and decide what kind of shutter speed you want.
Depending on whether if you’re shooting macro close-up, portrait, landscape anything static still where shutter is not of much concern it is more of the depth of field what you want go with your aperture priority mode and decide what kind of aperture you want. In all the cased keep a tab on what ISO is using because a very high ISO will leak noise images.
What is Focusing mode?
Now comes the next interesting part which is your focusing board and the focusing points. If you check out our display you should be currently on ‘One Shot’ mode. So even in case of Nikon you have the different kinds of modes. Let’s go into this by quick access button or you will see AF operation.
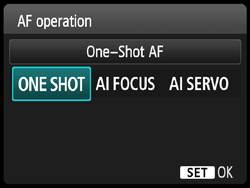
One Shot – In terms of Cannon and for Nikon guys it is AFS autofocus single. Typically one shot mode is used for total static subjects. So what happens in case of one shot mode when you half press the shutter release button you hear the beep. Of course, you need to have the beep enabled in your menu options. Once you hear the beep that means the camera has locked the focus onto that subject.
AI Servo – AI Servo for Canon and in case of Nikon it is AFC which is autofocus continuous. As the name suggests autofocus continuous you can keep the focus point on the subject and keep moving the camera along with the subject. So typically AI servo or autofocus continuous is used in cases where the subject is moving. Any kind of movies action photography any kind of situation where the subject is continuously moving in that situation keep the camera in Air servo or autofocus continuous mode. In this if you half press the focusing button the camera will continuously focusing. It will not stop so there is no concept of locking focus at that place. It locks the focuses but when you move the camera along the subject it continuously focus. So it is suitable for anything which is moving.
AI Focus – AI focus for Canon and AFA autofocus auto. In this particular mode if the subject is stationary internally the camera will move to one shot and you will hear the beep sound. In the case of AI Servo, you will not hear the beep sound because it is continuously focusing. AI focus will automatically move to single you will hear the beep but then if the subject starts to move of course in this situation you can again do the recomposition keeping the click button half-press move the camera and then click. In case of air focus if the subject is still and then it starts to move and you move the camera along with the subject internally it will move over from one shot to AI Servo. So the continuous focusing will start happening.
Note – If you are thinking to go with AI focus is probably the best option and we should use it as a beginner but my recommendation is don’t go with this option because there are certain situations where it takes time for the camera to detect that yes the movement has happened subject has started to move and this switch over from one shot to servo or autofocus single to autofocus continuously. There may be a lag or delay and you can miss those important shots.
So our recommendation for you as a beginner is either go with one shot for totally static subjects macro photography, landscape, portrait you are doing closeup so any of that product photography, fashion photography, portraits, monuments, so any of these things go with one shot and AI servo or autofocus continuous go in those situations where there is continuous movement happening homebody runs, in case of wildlife photography action, any of those things go with Al Servo. This is one of the best tips on how to become a photographer as only professional photographer use these features but a beginner should also know.
What is Focusing points?
In Canon, the rightmost button is at the top and even in case of Nikon you have the button in the front depending on your camera model where you can choose what kind of focusing point you want. In Cannon 1200 D if you press on the focusing points you will see the focusing points –
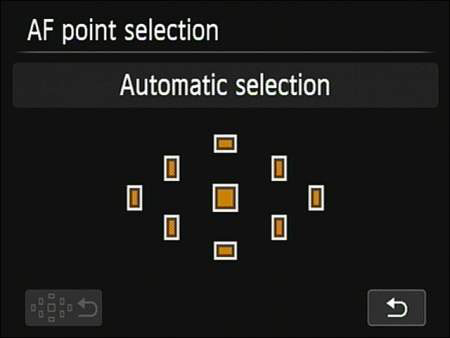
This is where you have to decide and our recommendation here is don not enable all the focusing points. Because what happens is these focusing points are responsible for getting the subject in focus. If you enable all the focusing points what happens is camera decides where and how to focus or on what subject within your frame it has to focus, based on how much light is the subject. So that is obviously not a good option because if there are two people standing one behind the other you want to focus at the front person, chances are if he is not properly lit the camera will focus at the back person who is more lit.
Avoid enabling all the focusing points and you decide to move your options around and based on how you want to compose. Move the focusing left right wherever you want to focus. Honestly, the centre focusing point is basically the most powerful one which is the fastest than all other.
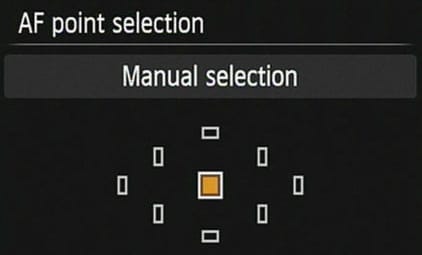
Depending on the camera model the number of focusing points also will vary. So depending on a number of focusing points you decide what form of composition, where you want to move, how we want to move the focusing point.
Metering
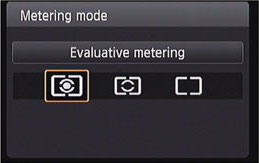
Now comes the most complex part of photography which is metering. Metering is quite interesting and that is actually the heart of photography based on which the exposure triangle parameters are decided. Be with any camera mode like Canon or Nikon the concept is same. Use the quick access button on your Canon camera and choose metering. There are different kinds of metering options. The entry level Cannon 1200 D has three options and missing with one important mode i.e spot metering. How to become a photographer article will help you so through each and every possible feature to convert you from beginner to professional.
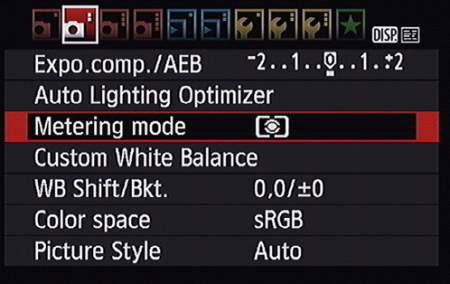
Types of metering
Evaluative Metering
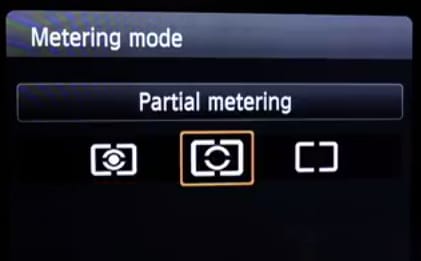
Partial Metring
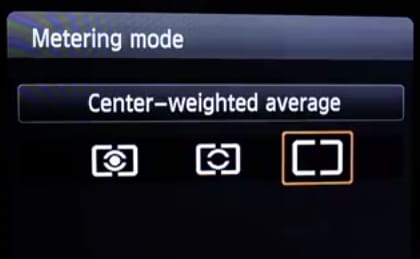
The centre weighted average metering
Spot metering (missing in Canon 1200d)
What is Metering?
Metering is nothing but more to do with the amount of light which is reflected from the subject. So the camera calculate how much light is reflected from the subject and to give you a vary basic exposure to give you an exposure where it’s not very dark where it is not very bright it will give you the shutter speed of 1 by whatever so that is metering.
Evaluative Metering – Evaluative metering for Canon and for Nikon it is Matrix metering. It does not take it from the centre at all like spot metering. In this, it evaluates that means what the camera does is basically takes the average of the whole scene. So it divides the entire segments how much light is basically is coming into the camera from the entire scene, not at the one single point. So from the entire scene how much that is coming into the camera, it will calculate and average it out and then it will give you a medium exposure. You can increase or decrease the darker and brighter side.
Partial Metring – Partial metering is simpler to spot metering where the camera focus from centre point for what you have, so typically in spot metering that centre focusing is an area of around 2 to 3 percent compared to your entire frame. Whereas partial metering takes a value of about 12 to 13 percent of that focusing point at the centre.
The centre weighted average metering – It gives more emphasis to the centre portion of the image. How much light is reflected from the centre portion of the image and then it gives you a particular shutter speed to give a medium exposure. So this is what metering does.
Note – The overall complexity of the metering is quite high. So as per recommendation to you as a beginner is to go with evaluative metering. Currently, go with an evaluative metering mode. This is complex training for beginners on how to become a photographer.
While doing photography you need to work on tonality.
What is tonality?
Tonality is darkness or brightness.
Tip how tonality work –
If you are shooting something very dark. If the overall average tonality of the whole scene is dark then you have to underexpose. Now if you find it confusing that if the shooting something dark then you need to under expose? Because the camera doesn’t make a dark image as dark it will make it a medium exposure.
If you are shooting something bright make sure you basically overexpose.
How much should you so underexpose or overexpose?
As much as you try and error by experimenting over a period of time you are going learn it.
No one teaches tonality, but it is one of the most effective things to help you a wedding photographer. This is another step forward on how to become a photographer.
In Conclusion
How to become a Photographer – In this article, we have explained to you some of the very basic fundamental concepts of photography. These are the core thing which you need to know as a beginner in photography. There are a lot of advanced things that is for later but get these fundamental concepts right. To summarize what is you have to be doing. The main thing obviously what kind of images quality as we said to go with the combination of RAW + large.
Then comes your white balance settings, in this avoid the auto white balance go with the white balance based on the lighting situation and then go with that particular preset.
Then comes your exposure triangle parameters – shutter speed, freezing the action, motion blur, handshake those things comes into the picture. Aperture – the depth of field comes into the picture. ISO is to do with noise – so you need to get full combination right based on what kind of metering you should use.
Another very impotent aspect is regarding the focusing so with respect to your focusing options whether you want to use one shot or autofocus single, air servo.
In this article, we have tried to give you maximum information on ‘how to become a photographer’. We will also add tips on ‘how to become a photographer’ or ‘Learn photographer professionally‘ or ‘how to become a photographer advance settings’ or ‘how to become a wedding photographer’ or ‘Photographer salary around the world’ or ‘how to become a photographer within few days of learning’ and ‘how to become a photographer with 7 easy steps‘.